1. Getting Started
1.1 ROOT
ROBAST depends on only ROOT libraries. If you have already installed ROOT on your Linux or Mac, please check whether environmental variables ROOTSYS, LD_LIBRARY_PATH, and PATH are properly set in your shell. If ROOTSYS points to /usr/local/root for example, LD_LIBRARY_PATH and PATH are usually set to /usr/local/root/lib and /usr/local/root/bin, respectively.
Please first check if your ROOT and its geometry tutorial work properly by running ROOT tutorials.
$ cd $ROOTSYS/tutorials/geom
$ root
root [0] .x geomAlice.C
The ALICE detector should appear in an OpenGL view. If not, please confirm that your system has OpenGL libraries.
1.2 Building ROBAST
You must have software development tools such as GNU Make and GCC (or Cling) installed on your machine. As we do not provide pre-compiled ROBAST binary files, you must build ROBAST from the source code.
Clone the ROBAST Git repository on your machine, and run make.
$ git clone --branch v3.1.0 https://github.com/ROBAST/ROBAST.git ROBAST-3.1.0
$ cd ROBAST-3.1.0
$ make
You can also download a .tar.gz or .zip file for each release tag from the download page.
$ curl -L -O https://github.com/ROBAST/ROBAST/archive/v3.1.0.tar.gz
$ tar zxvf v3.1.0.tar.gz
$ cd ROBAST-3.1.0
$ make
If you use bash or zsh, add the following line in your $HOME/.bashrc, $HOME/.zshrc, or any equivalent (don't forget to replaceYOUR_ROBAST_DIRECTORY with your actual ROBAST path!).
export LD_LIBRARY_PATH=YOUR_ROBAST_DIRECTORY:$LD_LIBRARY_PATHIf you use tcsh, the following line must be added to $HOME/.tcshrc instead.
setenv LD_LIBRARY_PATH YOUR_ROBAST_DIRECTORY:{$LD_LIBRARY_PATH}In addition, you must add the ROBAST include directory to the ROOT search path. Add the following line to your existing $HOME/.rootlogon.C
gInterpreter->AddIncludePath("YOUR_ROBAST_DIRECTORY/include");or create a new one with the following lines.
{
  gInterpreter->AddIncludePath("YOUR_ROBAST_DIRECTORY/include");
}
1.3 Testing ROBAST
OK. Let's try a ROBAST tutorial to see how ROBAST works.
$ cd ROBAST-3.1.0/tutorials
$ root
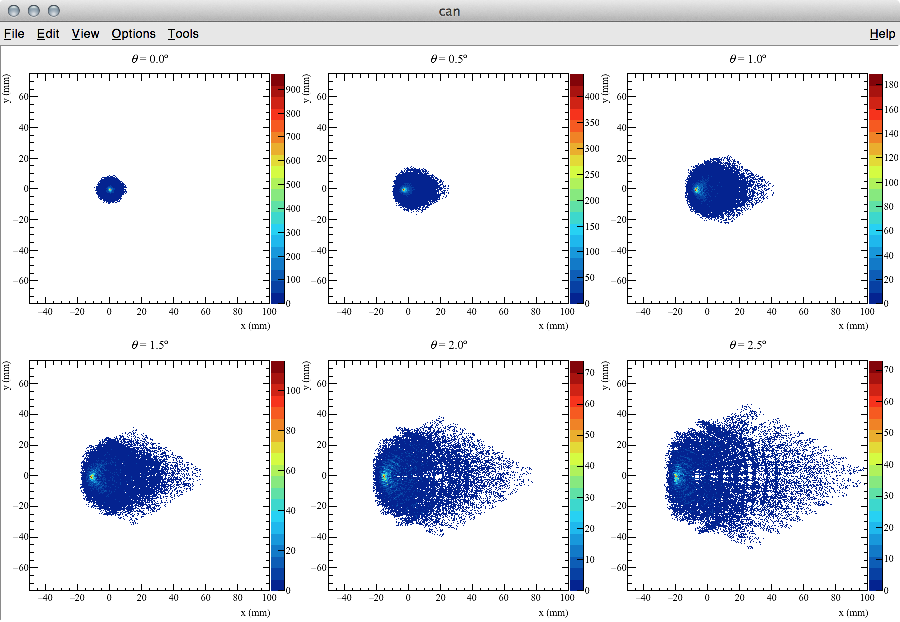
root [0] .x HESS1.C+You will get an OpenGL view of the H.E.S.S. I optical system (Davies–Cotton) and spot diagrams for various field angles.
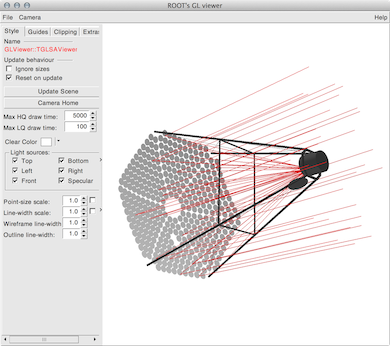
You can drag, rotate, and zoom the 3D objects in the OpenGL window. Please refer to the help page of the OpenGL window (click "Help" → "Help on GL Viewer…") for details.
There are many other tutorial programs in the same directory. Please try them out!
1.4 Unit test
There is a short unit test program in the tutorial directory. As it uses the unittest package of Python, please properly set your PYTHONPATH (see Section 1.2).
$ cd ROBAST-3.1.0/tutorials
$ python unittest_robast.py
(snip)
----------------------------------------------------------------------
Ran 8 tests in 3.459s

OK1.5 HTML Reference Guide
Auto-generated HTML reference guide for ROBAST classes is also available at htmldoc/ClassIndex.html.
2. Simulating a Mirror
In this section you will learn how to simulate a mirror using ROBAST. First, let's make a “world” in which all of your optical components are created and simulated. The “world” must be large enough to encapsulate all the optical components. In the example below, you can make a box with a dimension of 200 cm × 200 cm × 200 cm.
$ root
root [0] const double cm = AOpticsManager::cm()
root [1] AOpticsManager manager("manager", "My first manager")
root [2] TGeoBBox box("box", 100*cm, 100*cm, 100*cm)
root [3] AOpticalComponent world("world", &box)
root [4] manager.SetTopVolume(&world)
AOpticsManager::cm() returns 1, and it is strongly recommended to always use AOpticsManager::cm(), AOpticsManager::nm(), and other similar static methods in your simulations.
new in the above example intentionally. However, when you write your own code in your function, please use new and pointers. Otherwise the geometry objects will be automatically removed from the memory when exiting the function. The example in the next section will show you how to use heap objects.
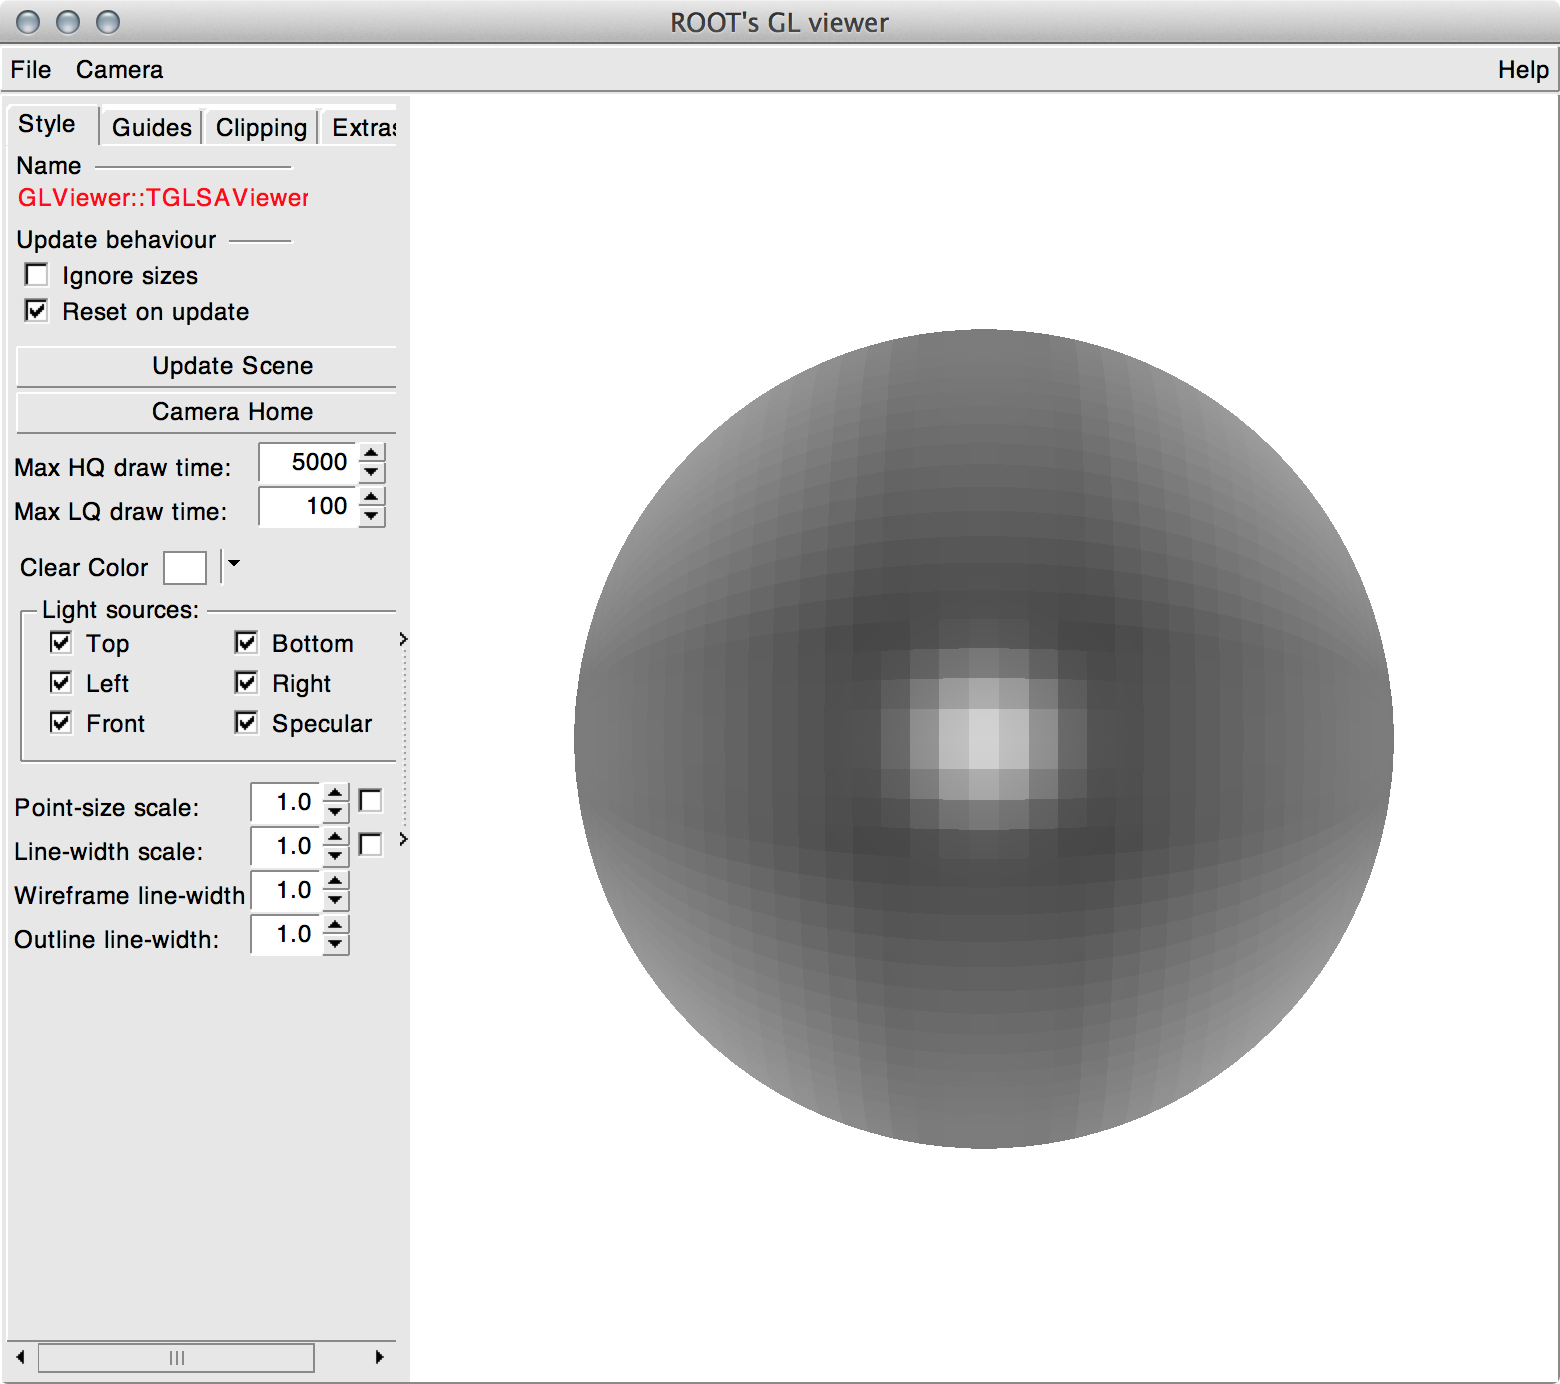
Now your “world” is ready. Let's make a spherical shell mirror with specular surfaces and add it in the “world”. You can draw the 3D model of this mirror in an OpenGL window (use the "ogl" option) as shown in Fig. 3. This mirror has ideal reflectance of 100%.
root [5] TGeoSphere sphere(99*cm, 100*cm)
root [6] AMirror mirror("mirror", &sphere)
root [7] world.AddNode(&mirror, 1)
root [8] manager.CloseGeometry()
root [9] world.Draw("ogl")
root [10] manager.SetNsegments(100)TGeoManager::SetNsegments (TGeoManager is the base class of AOpticsManager). The default value is 20, but it is a bit too small for your presentation images.
Can you tell what will happen if you simulate a ray propagating inside this sphere? What is the general locus (track) of such a photon with arbitrary initial position and direction? If you cannot tell the answer immediately, let's simulate the (geometrical) photon track by ROBAST.
root [11] const double nm = AOpticsManager::nm()
root [12] ARay ray(0, 400*nm, 30*cm, 20*cm, -40*cm, 0, 5, -9, -2)
root [13] manager.TraceNonSequential(ray)
root [14] TPolyLine3D* pol = ray.MakePolyLine3D()
root [15] pol->SetLineWidth(3)
root [16] pol->SetLineColor(2)
root [17] pol->Draw()ARay::Aray is the track ID which is not used in ROBAST, and so any value is OK. The wavelength of this ray is 400 nm, the initial position is (X, Y, Z) = (30 cm, 20 cm, -40 cm), and the direction is (5, -9, -2). The 6th argument is the time when the ray starts from the initial position.
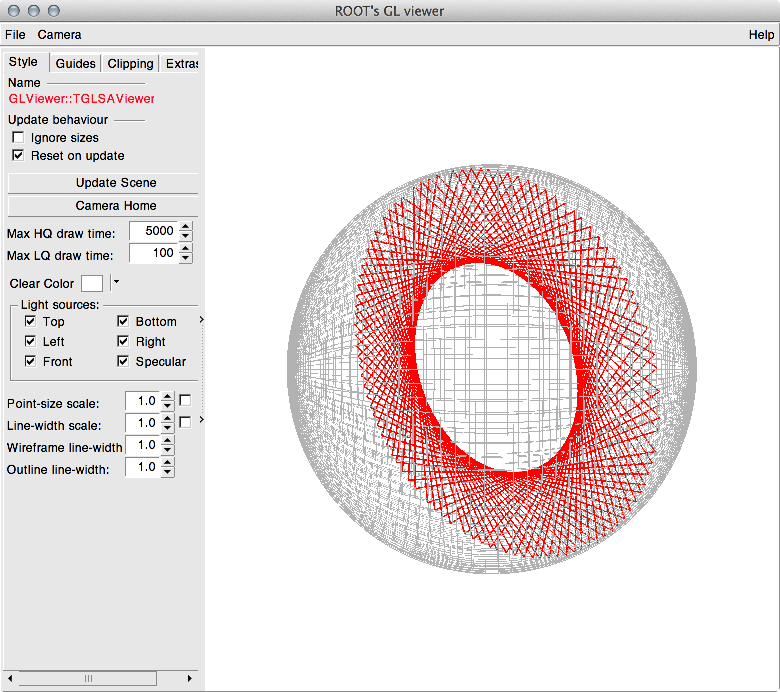
You cannot see the photon track because the mirror is not transparent (you can change the transparency later). So click the OpenGL view window and press your W key. The OpenGL view will be changed to the wire frame mode as shown in Fig. 4. Does the photon track look like what you imagined?
The number of reflections inside the spherical mirror with 100% reflectance is ideally infinite. However, AOpticsManager::TraceNonSequential must be suspended at some point to avoid an infinite loop. Therefore, this number is limited to 100 by default. You can change this upper limit by calling AOpticsManager::SetLimit.
When an ARay propagation is suspended, its internal status is changed to “suspended.”
root [17] ray.IsSuspended()
(const Bool_t)1AMirror object is a volume (AMirror is derived from TGeoVolume) whose whole surfaces are specular. The spherical shell defined here has a 49 cm inner radius and a 50 cm outer radius, and therefore both the inner and outer surfaces are specular. This is why the photon in Fig. 4 is repeatedly reflected on the inner surface.
3. Simulating a Lens
The next step is a lens simulation. For simplicity, we will make a triangular prism made of SCHOTT N-BK7. The prism geometry is made with the TGeoTrd1 class (https://root.cern.ch/root/html604/TGeoTrd1.html). In a similar way to the AMirror class, the prism is made with the ALens class as shown in Fig. 5.
root [0] const double cm = AOpticsManager::cm()
root [1] AOpticsManager* manager = new AOpticsManager("manager", "My second manager")
root [2] TGeoBBox* box = new TGeoBBox(30*cm, 30*cm, 30*cm);
root [3] AOpticalComponent* world = new AOpticalComponent("world", box)
root [4] manager->SetTopVolume(world)
root [5] TGeoTrd1* trd1 = new TGeoTrd1(10*cm, 0*cm, 5*cm, 10*cm)
root [6] ALens* prism = new ALens("prism", trd1)
root [7] prism->SetRefractiveIndex(AGlassCatalog::GetRefractiveIndex("N-BK7"))
root [8] world->AddNode(prism, 1)
root [9] manager->CloseGeometry()
root [10] gGeoManager->GetTopVolume()->Draw("ogl")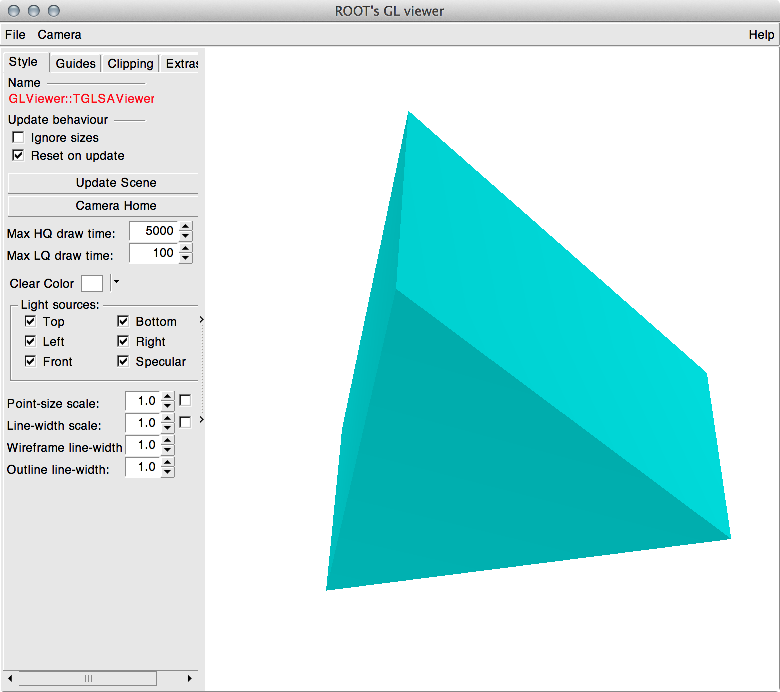
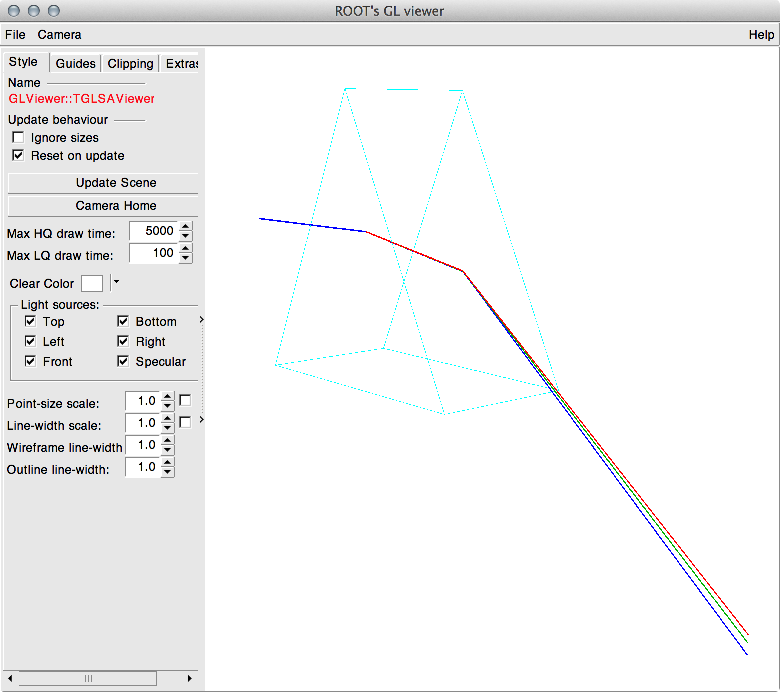
We did not worry about the photon wavelength in the mirror simulation example, but the prism has refractive indices for different colors. So now different wavelengths will show you different simulation results. Fig. 6 illustrates the simulated photon tracks of three different colors (400, 500, and 650 nm). You can see that your first prism really works as a prism!
root [11] const double nm = AOpticsManager::nm()
root [12] ARay blue(0, 400*nm, -20*cm, 0*cm, 0*cm, 0, 1, 0, 0)
root [13] ARay green(0, 500*nm, -20*cm, 0*cm, 0*cm, 0, 1, 0, 0)
root [14] ARay red(0, 650*nm, -20*cm, 0*cm, 0*cm, 0, 1, 0, 0)
root [15] manager->TraceNonSequential(blue)
root [16] manager->TraceNonSequential(green)
root [17] manager->TraceNonSequential(red)
root [18] TPolyLine3D* polB = blue.MakePolyLine3D()
root [19] polB->SetLineColor(4)
root [20] polB->SetLineWidth(3)
root [21] polB->Draw()
root [22] TPolyLine3D* polG = green.MakePolyLine3D()
root [23] polG->SetLineColor(3)
root [24] polG->SetLineWidth(3)
root [25] polG->Draw()
root [26] TPolyLine3D* polR = red.MakePolyLine3D()
root [27] polR->SetLineColor(2)
root [28] polR->SetLineWidth(3)
root [29] polR->Draw()manager->DisableFresnelReflection(kTRUE).
Please note that the non-sequential ray tracing in ROBAST is halted when a ray exits the world. In Fig. 6 the rays propagate from the initial point at left, and they exit the world at the right bottom in the window. You can check the ray status by calling ARay::IsExited().
root [30] blue.IsExited()
(const Bool_t)1